Workspace - What Is It, How to Create One
What Is a Workspace
When you open UTM.io, you land on the links dashboard. However, what you may not notice is that you’re looking at the links dashboard for a specific Workspace. Workspaces are meant to be separated silos for you and your team to work in. You can only see the links that belong to the Workspace you’re currently in (the app defaults to the Workspace you were in right before you signed out). Templates and saved parameters are also specific to the Workspace they’ve been created in.
It is also worth noting that previously Workspaces used to be called Projects, but we think the word Workspace is a clearer way to describe how the functionality should be used.
What is that good for? Separate data into multiple Workspaces is a great way to store links, templates, and parameters for different teams, clients, or locations. For example:
If you have a dedicated paid social media team, they may not need to see the same parameters and templates as your display ads team
For agencies, you would want to separate out links for each client. This way you can invite your client to view your work inside UTM.io as well.
Another great way to separate Workspaces is by physical location when your company has multiple locations or offices
Workspaces are used by admins to create separate UTM routines for the different brands or websites managed by one team. Further, Workspaces allow admins to assign team members to specific brands or websites that the links are created for, instead of always having to give access to the whole UTM.io account.
Assuming you are an analytics practitioner, you are most likely familiar with Workspaces in Google Tag Manager. The trait that Workspaces in GTM share with Workspaces in UTM.io is that they enable team collaboration and multiple versions of a UTM routine for the same team.
Benefits
Enhanced link management via separating links and saving them in a Workspace specific to the relevant brand or website
Enhanced management of templates and saved parameters via making the guidelines specific to the brand or website at hand
Enhanced access permissions management via assigning team members to a specific Workspace instead of all links, templates and parameters
How to Create a Workspace
Each new team comes with a default Workspace named "Your first Workspace." If you'd like to create a new Workspace:
1. Select the Workspace dropdown from the top left of your dashboard and choose "Create Workspace."
2. Give your Workspace a descriptive name, choose a “Space Character” (further explanation below), assign team members (you can add or remove them later)
Hit Save Workspace and UTM away!
Workspace Features & Management
While Workspaces clearly separate sets of UTMs, they also provide flexibility for admins. For most Workspace management options listed below, you’ll start by the following two steps:
Click “Manage Workspaces”, a link in the “Workspace” dropdown, top left in most screens of the tool
Click on the pencil icon to the left

#1 Control Who Can See the Workspace
Assigning specific team members to a Workspace is a core step to leveraging the benefits of Workspaces.
To manage who can see and work in a Workspace:
- Open the “Manage Workspaces” screen and click on the pencil icon, as shown in the gif at the top of this article section titled “Workspace Features & Management”
- In the field labeled “Add Users”, enter the email addresses the team members use for their utm.io accounts. If they don’t currently use utm.io, you will need to invite them and make sure they accept the invitation before adding them.
- You can remove users through this window as well
- When you’re done adding or removing team member email addresses, click “Save Workspace.”

If you leave the list blank, Workspace will be seen by account owners. This is useful when you create Workspaces for testing UTMs, or other sandbox use cases. You can, for instance, work in a private Workspace to create a UTM routine you’re confident about, and only share it with other team members once it’s filled out with consistent links, templates, and parameters.
#2 Rename a Workspace
When the purpose or character of your Workspace evolves, it may be a good time to keep your naming accurate.
Open the “Manage Workspaces” screen and click on the pencil icon, as shown in the gif at the top of this article section titled “Workspace Features & Management”
Under “Workspace Name”, enter the updated name. Descriptive names are much better than names that make team members guess.
#3 Archive or Restore (Unarchive) a Workspace
When a Workspace is no longer in use or relevant, we recommend archiving it. This will help you keep your routines clean and avoid confusion among team members.
To archive a Workspace:
- Open the “Manage Workspaces” screen and click on the pencil icon, as shown in the gif at the top of this article section titled “Workspace Features & Management”
- Click “Archive Workspace”. This will hide the Workspace from the Workspace dropdown. Team members won’t be able to choose to work from it anymore.
If you were an admin of a Workspace and you now want to bring it back:
- Open the “Manage Workspaces” screen, as shown in the gif at the top of this article section titled “Workspace Features & Management”
- Sort the Workspaces by “Status” to bring the “archived” ones to the top
- Click the pencil icon to the left
- Click “Restore Workspace”, the button that will now appear instead of “Archive Workspace”

#4 Switch between Workspaces
To switch a workspace you’re working in:
- Click on the Workspace dropdown. This button shows in all of the four main tabs - Links, Templates, Parameters, Workspace Members.
- Select the Workspace you wish to work in right now

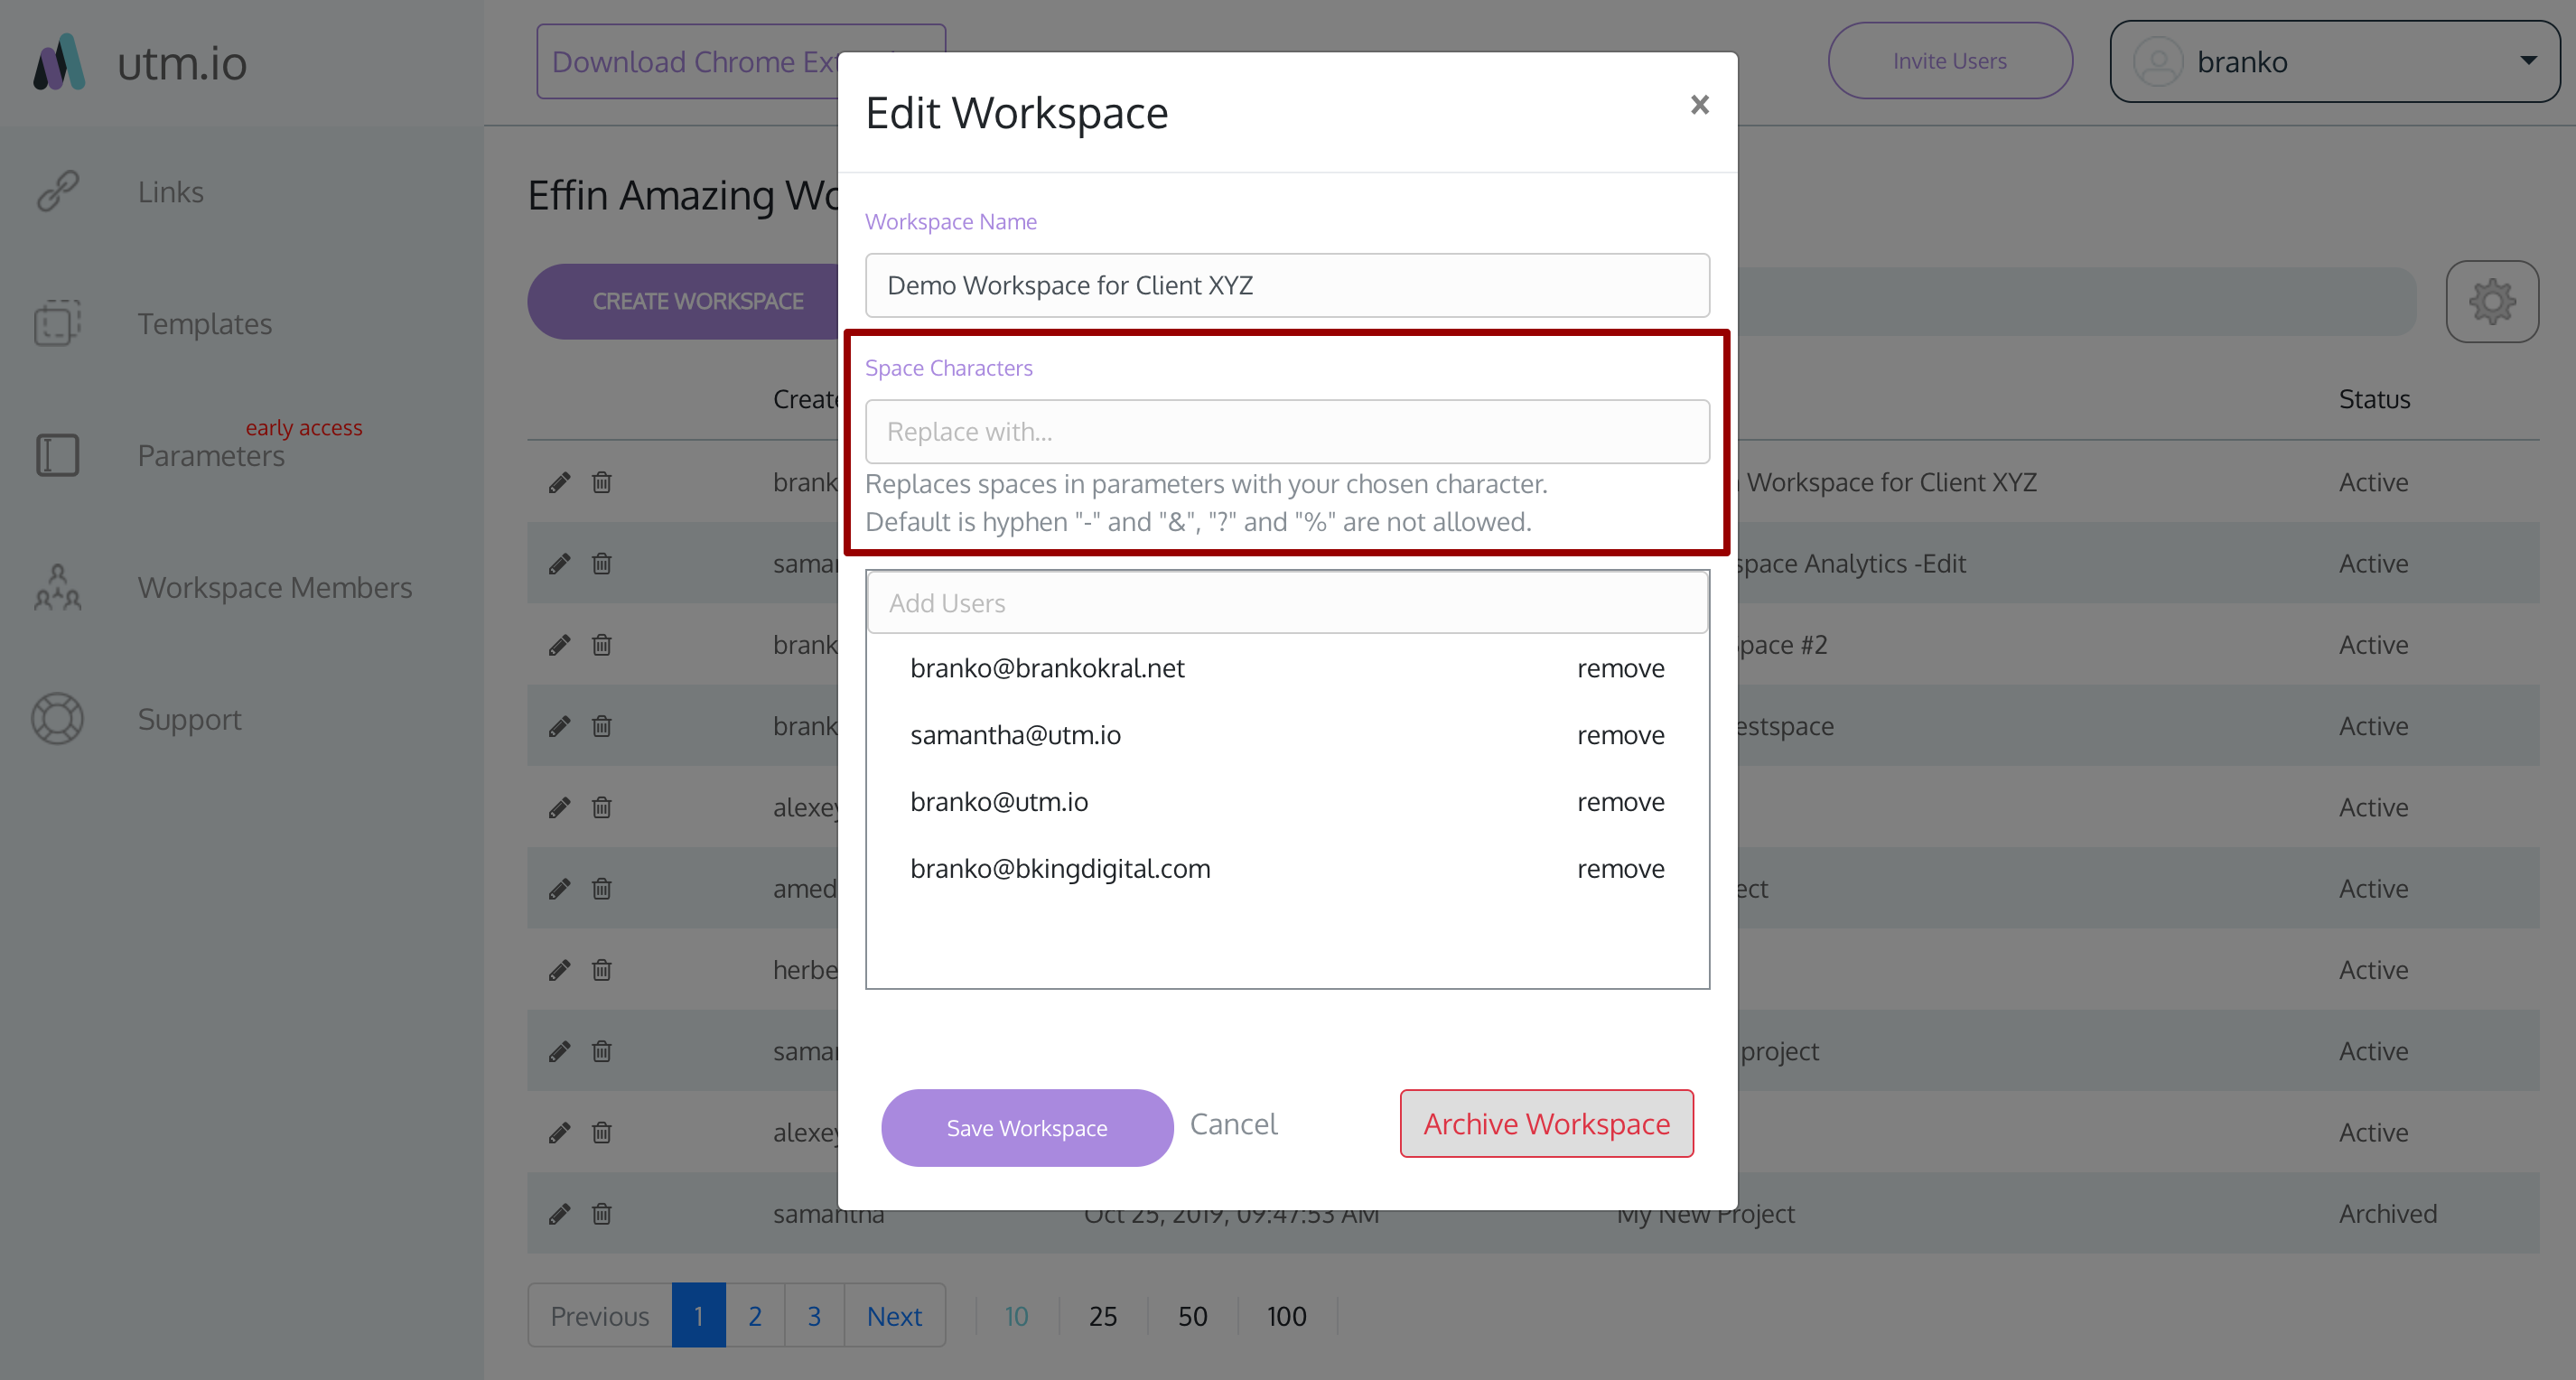
#5 Choose a Custom Space Character
The “Space Character” option lets you choose the character to be used to automatically fill in for blank spaces in your UTM parameters. If you leave the field blank, it will default to a hyphen. When you then, for instance, save “paid social” as a parameter for medium, the app will actually save it as “paid-social”. UTMs can’t use blank spaces.
If you put in the underscore sign as your space character, “paid social” would be saved as “paid_social”.
You set this up from the usual “Manage Workspaces” screen, as shown in the gif at the top of this article section titled “Workspace Features & Management”:
We do recommend as a best practice that you use a hyphen or dash.
Use Cases
Marketing Agency or Consultant
Let’s assume you’re an agency with 8 clients that you set up measurement for. In order for the data to be accurate, you need the client teams to keep using UTMs consistently. You create the routine for each client and coach the teams up on how to use them properly. So you add each client and their team members into your own UTM.io account that you provide, but you don’t want for them to see each other’s links, templates, or parameters. To solve that, you create 8 Workspaces, one for each client. Everyone in your account will only have access to the Workspace you assign them to; nobody on client team 1 will be able to view or work on links for clients 2–8.
Enterprise Marketing Department
Let’s assume you’re the director of a company with three brands. Your team members span a variety of roles. Some of them, such as your marketing operations and demand generation professionals, need to be able to review and edit links for all three brands. Others, such as the social media managers, only need to be able to work on links for one brand. You create three Workspaces - one for each brand, assign the marketing ops and demand gen people to all three, assign the social media managers to one at a time.
Individual Marketer Consultant
Let’s assume your marketing freelance practice has been getting busier and you made your first hire. You’ve been training them up and you trust them enough to give them a member or admin user role. But you want to avoid overwhelming them with too much new information. You create a sandbox Workspace where you put links for your own website only, not client websites, and assign the new hire to that one isolated Workspace only.
The Bright Future of Faster Workspace Management for UTM.io Black Belts
We continue to build out the tool in ways that help teams save time and collaborate better. Some of the features we’re working on during the writing of this article (March 2020) include:
- Copy templates and parameters from one Workspace to another - Enforce taxonomy across many Workspaces
- Create global parameters that span all your Workspaces - Manage taxonomy better across many Workspaces
- Upload templates from a CSV into a Workspace - Quickly set up a new workspace from scratch
- Upload links from a CSV into a Workspace - Migrate to us from another link management system like Bitly or semi-automated Google Sheets
We’re looking forward to seeing how this functionality helps your work. If you still need help, have feedback, or want to share an idea, please contact us - [email protected].