What is the 'Rules' feature in UTM.io?
Making consistent UTM links is hard, especially when a lot of different users are creating links in your organization and they have to follow advanced UTM conventions.
On popular request, we have developed the Rules feature that was designed to enforce UTM conventions across large teams.
Table of content:
1- How does the 'Rules' feature help ensure consistent UTM conventions across teams?
2- What is the 'Rules' feature and how to use it?
- Workspace level rules
- User-level rules
3- What rules look like in the link builder?
4- Who can use the rules feature on UTM.io?
How does the 'Rules' feature help ensure consistent UTM conventions across teams?
1. Lock-down the builder for your team: The rules feature provides the ability to lockdown the builder so that users cannot make mistakes. You can ensure control over your UTM links by defining blocked fields, restricted fields, prohibited characters, etc. (List of functionalities given below)
2. Build and enforce advanced UTM conventions: The rules feature provides numerous ways to build complex utm conventions across the builder through a combination of parameters, attributes, and dynamic variables.
3. Build different rules for different teams: You can force any rule on different users or user groups. For instance, there can be a rule for field marketers and a completely different one for social media teams. This helps in streamlining the link-building process and improves consistency across campaigns.
4. Simple for downstream users: Rules make the UTM link creation process convenient for the downstream user as the link builder is customized to their unique needs.
What is the Rules feature and how to use it?
Rules feature gives you endless possibilities. You can customize the link builder in whatever way you like.
Workspace Level Rules: These Rules are defined at the Workspace level and are applicable to all users in the workspace.
- Space Character: You can define the character that replaces the ‘space’ in all UTM and custom values. For instance, you can input ‘-’ to replace spaces in your links.
- Prohibited Characters: The feature also allows you to prevent certain characters from being used in the builder, for instance: ‘$’, ‘%’, and ‘&’.
- You also can prohibit some well known values using: <comma>, <space>, <letters>, <numbers>, <symbols>.
- You can even use Regular Expressions for advanced patterns: <regex:YourRegexPattern>.
- Example: <regex:^ba.*>
-
In the example, we are prohibiting words starting with the letters "ba".
- Force Lowercase: You can also force all campaign parameters to lowercase or pick which parameters to force to lowercase by simply checking a box.
Here is GIF showing how to define workspace rules

User Level Roles: These rules can be applied to specific users or user groups in your workspace.
- Required Field: Checking the required fields box makes the use of a parameter and attribute necessary in the link builder. These required parameters and attributes will show up on the builder with asterisk and they must be filled to create a link.
Google requires campaign, source, and medium or it will not properly save the information. But you can apply this feature to make any parameters or attributes mandatory as per your use-case.
- Blocked Field: Once you block a field, no one in your team will be able to add a value for the blocked field.
For instance, if you want to block ‘medium’, you would check the corresponding box under the ‘Blocked Field’ section. The blocked field will show up on the builder but the users cannot make any changes to the blocked parameter.
- Can Type: The ‘Can Type’ feature allows users to type in the value for any parameter. They can either type in a new parameter values or select from the saved drop-down values. (Learn how to save drop-down values by reading this article)
- Hidden fields: You can also hide certain fields from the builder. For instance, the user can hide a parameter to not show up on the builder.
- Max Limit: This feature allows you to enforce a character limit by specifying the maximum character to be embedded for each parameter and attribute. For instance, for campaigns, you can set the maximum character limit to be ‘10’.
- Prohibited Values: You can prohibit specific characters, words or alphabets from being used by defining them in the ‘Prohibited Values’ section. For instance, for campaigns, you can prohibit the use of ‘%’ and ‘&’.
- Custom Instructions: The ‘Custom Instructions’ section allows you to add specific comments regarding any parameter or attribute. These instructions will show up on the link builder as a placeholder. For instance, you can give users instructions that the specific field can only be selected from the dropdown menu.
Creating Rules using these variables is quick and simple.
Here is GIF showing how you can create Rules in UTM.io:

How to add Users to the rule sets
- Click the "add members" at the bottom of the page to add members to your rule sets.
- A modal will pop up where you can select a team member or multiple team members.
- Finally, click "save workspace settings" button.
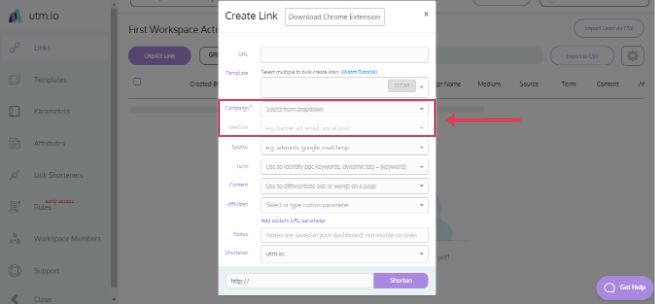
What Rules look like in the Link Builder?
In this example, we applied three Rules to the link builder:
- Campaign is set as a required field. You can see a red asterisk against the campaign parameter.
- The custom instruction ‘Select from dropdown’ is shown as a placeholder for the campaign parameter to guide the end-users.
- We have also blocked the Medium field to prevent the end-users from adding a value for it.
Who can use the Rules feature in UTM.io?
- Plan availability: The Rules feature is available starting on the Plus plan. Each tier includes everything from the plans below it, plus additional scope:
- Plus — Rules on Campaign, Medium, and Source
- Professional — Everything in Plus, plus Rules on all standard UTM codes
- Business — Everything in Professional, plus Rules on Custom Parameters
- Enterprise — Everything in Business, plus Rules on Attributes
See the pricing page for the full feature breakdown, or contact support if you need help choosing a plan.
- Access Level: You need to be an admin or an owner of the Workspace to create Rules. These Rules can then be applied to Members added to your Workspace.